

If your crew logs issues on paper or through scattered emails, fixes take longer and costs go up. I’d sum it up like this: use one mobile process to log the problem, add photos, route it to the right team, track status, and close it on site with proof.
Here’s the short version of what matters most:
- I need standard mobile forms for install, QA/QC, service, and warranty work
- Every ticket should include asset ID, severity, technician, job number, and local time
- Photos, test readings, and files should stay attached to the same ticket
- Safety issues should be sent out at once, with targets like 1-hour review for critical hazards
- Closeout should include post-repair photos, parts used, test results, and a digital signature
- The main numbers to watch are cycle time, repeat visits, SLA misses, and rework cost
A mobile workflow cuts delays because the office can see issues the same day instead of waiting for notes to come back from the field. It also helps reduce repeat trips, missed handoffs, and missing closeout records.
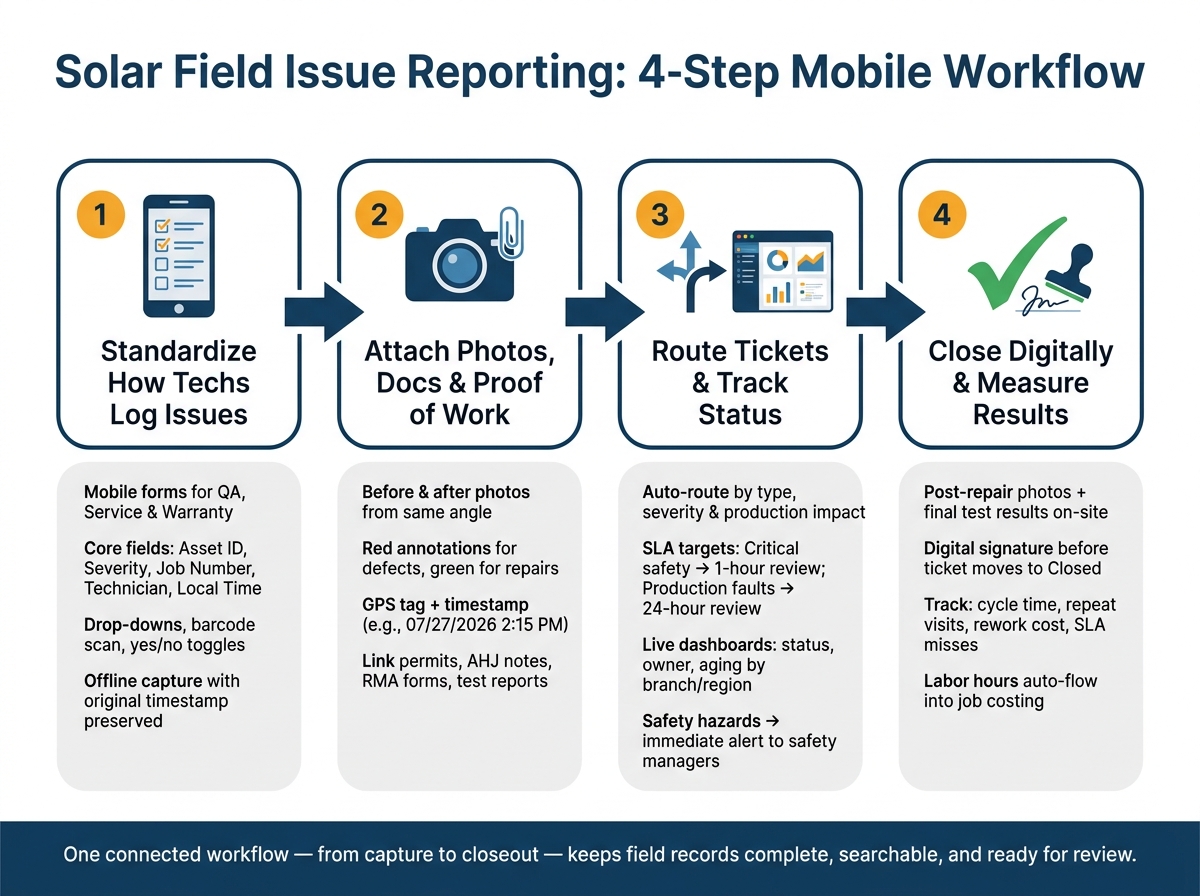
If I were putting this process in place, I’d focus on four steps:
- Standardize how techs log issues
- Attach photo proof and job files
- Route and track tickets in one system
- Close and measure every repair digitally
| Step | What happens | Why it helps |
|---|---|---|
| 1 | Tech logs issue on phone or tablet | Cuts vague notes and missing info |
| 2 | Tech adds before/after photos, readings, and files | Gives office staff proof and context |
| 3 | Ticket goes to the right queue by type and severity | Cuts back-and-forth and SLA misses |
| 4 | Crew closes job on site with results and signature | Keeps records complete and easier to review |
Bottom line: if you want field issue reporting to work for solar teams, keep it simple, structured, and tied to one record from first notice to final closeout.
Step 1: Standardize How Technicians Log Issues in the Field
Start with the form. If the form is consistent, office teams can route tickets fast without stopping to hunt for missing details. When every technician logs issues the same way, the handoff from field to office gets a lot smoother.
Set Up Mobile Forms for QA, Service, and Warranty Visits
Use separate templates for QA, service, and warranty visits. Each one should include a common core section with the same baseline details every time:
- project/job number
- customer/site
- asset ID
- issue type
- severity
- local date and time (MM/DD/YYYY, h:mm AM/PM)
- impact
- technician
- status when logged
That gives office teams enough context to triage the ticket without making follow-up calls. The aim is simple: one record that both field and office teams can use, with no retyping.
Then add a section built for each visit type. QA forms should include pass/fail checklists and a PTO readiness field. Service call forms should cover diagnostic steps, whether the fix was temporary or permanent, parts used, and whether a return visit is needed. Warranty forms should include warranty type, rework classification, and RMA or manufacturer case numbers.
| Visit Type | Tailored Section Focus |
|---|---|
| QA Inspection | Pass/fail checklist, overall QA score, AHJ or utility notes, PTO readiness |
| Service Call | Diagnostic steps, fix type (temp vs. permanent), parts used, return visit needed |
| Warranty/Rework | Warranty type, eligibility check, rework classification, RMA/manufacturer case number |
Use Structured Inputs to Improve Data Quality
Free-text fields can turn clean records into a mess. If a technician types vague notes instead of picking a standard value, that ticket becomes harder to auto-route, filter, and report on. Drop-downs, radio buttons, and checkboxes fix a lot of that.
Use drop-downs for equipment model/type and resolution type. For safety checks like arc-fault detected, exposed conductors, and trip hazard, yes/no toggles work best. And when it comes to equipment ID, scanning a barcode or QR code on an inverter or module beats typing a serial number by hand every time. It also lets the system auto-fill model, manufacturer, and warranty terms from existing asset records.
For measurements and notes, stick to U.S. standard units throughout. Use feet and inches for distance, °F for temperature, and the same voltage/amperage notation on every form. Small detail? Sure. But it keeps notes clean and reporting usable.
Standard values also make routing and reporting automatic. Clean inputs let the system sort tickets by type, priority, and asset without guesswork.
Add offline capture. Solar sites often have weak signal, especially on rooftops and rural ground mounts. Forms should save locally so technicians can finish the full ticket, add photos, and sync later when service comes back. And the system should keep the original capture timestamp, not the sync time.
Once the ticket is saved, attach photos and documents to that same record. Then attach photos and proof of work directly to the ticket.
Step 2: Attach Photos, Documents, and Proof of Work to Each Ticket
Once the issue is logged, add photos and documents to that same ticket. That way, office teams can route, review, and close the work without chasing people down with follow-up calls.
Take Before-and-After Photos from the Device
Technicians should take before photos as soon as they spot the issue. Get close-ups of the defect, then add a wider shot that shows the array, nearby equipment, and site safety conditions.
Then take after photos from the same angle. If the angle matches, the repair is much easier to verify.
Use annotation tools to mark defects in a clear way. A simple setup works well: red for defects, green for finished repairs.
Add a short note with the photos. If the situation is complex or hazardous, record a voice memo instead.
Once the images are captured, store them with the ticket so office teams can review everything in one place.
Organize Documentation by Job, Location, and Timestamp
Every photo and document from the field should automatically inherit the job number, ticket ID, and customer account from the parent record. GPS tagging should tie each image to a physical location, like a ground-mount array or the main service panel. Timestamps should log the exact local date and time – such as 07/27/2026 2:15 PM – along with the technician’s name or ID. That creates a clear audit trail for warranty validation, safety audits, and performance analysis. When records are organized, office teams can finish review and approval without delays.
Link test reports, permits, AHJ notes, and warranty or RMA files right to the ticket. Keep every photo, note, voice memo, and file tied to the same job and asset record.
Use the same setup for every ticket type:
| Documentation Type | What to Capture | Why It Matters |
|---|---|---|
| Before photos | Defect close-ups, context shots | Establishes proof of issue and site conditions |
| After photos | Repairs from matching angles | Confirms work was completed to standard |
| Annotations | Labels, circles, arrows on defect images | Makes photos actionable for office and warranty teams |
| Technical readings | String voltage, inverter data, insulation resistance | Supports performance verification and warranty claims |
| Linked documents | Permits, AHJ notes, RMA forms, test reports | Provides compliance and contractual context |
| GPS + timestamp | Location, local date/time, technician ID | Creates audit trail for warranty, service, and safety |
Step 3: Route Tickets, Track Status, and Manage Work in One System
Once the ticket is logged and documented, the next job is simple: send it into the right office workflow.
Route Issues to the Right Office Team by Type and Priority
Route tickets based on type, severity, location, and production impact. Severity should be scored by risk to people, property, and production. That way, the right team sees the issue fast instead of losing time in back-and-forth.
An inverter fault or production-loss ticket should go straight to the service queue. A roof penetration or structural concern belongs with construction or roofing. Electrical, fire, and fall hazards need to go to safety managers and regional supervisors right away.
Set SLA targets such as:
- Critical safety items reviewed within 1 hour
- Production-impacting faults reviewed within 24 hours
Track Open, In-Progress, and Resolved Issues from Dashboards
After routing, that same record should show status, owner, and SLA timing in real time. Dashboards should make ticket status, ownership, and aging easy to scan, broken down by branch, region, and team.
Technician panels should also show current workload and upcoming appointments. That gives dispatchers a clear view of who can take on more work and helps prevent overbooking. Aging reports flag tickets that have gone past SLA targets, such as a service call left open for more than 7 days or a safety item that hasn’t been reviewed within 24 hours.
Live dashboards cut down on email follow-ups by showing status, ownership, and aging in real time.
Use Blu Banyan Tools to Connect Field Reporting with ERP Records

When field tickets sync with ERP records, operations, inventory, and accounting stay in step. Blu Banyan’s SolarSuccess, built on NetSuite, links field issue tickets directly to project records, customer accounts, asset serial numbers, and inventory in one system.
So if a technician logs an inverter fault, that ticket connects to the original installation project, the customer’s CRM record, the specific inverter, and the parts pulled from inventory. Labor hours and costs are also recorded in accounting automatically. bluChat keeps comments on the ticket, so field and office teams can work from one shared thread.
Step 4: Close Issues Digitally and Measure Results
Close Work with Post-Repair Photos and Digital Sign-Off
Once the right team finishes the repair, close the ticket on site before the crew leaves. The closeout should happen on the device: finish the checklist, add post-repair photos, enter final test results, log parts used, and capture a digital signature before the ticket moves to Resolved or Closed.
It helps to require every mandatory field before closeout. That cuts down on missing paperwork and extra truck rolls. Before the crew heads out, collect a digital signature from the customer or supervisor right on the device. Then the ticket updates to Resolved or Closed and alerts the office team. Those final records feed cycle-time and rework reporting.
Measure Cycle Time, Repeat Visits, and Rework Cost
The next payoff is the data. Track cycle time, repeat visits, and rework cost. Timestamped stages show where delays happen. Labor hours and truck costs show how much rework each ticket creates.
bluTime ties labor hours straight to each issue ticket, recording who worked, how long, and in what role. That data flows into job costing automatically. When labor, photos, and sign-off live in one record, the numbers are easier to trust.
bluDocs stores photos, test reports, checklists, and signed forms in one linked record with version control, so office teams can pull the full closeout package fast.
Conclusion: Build a Repeatable Process from Issue Capture to Closeout
The full workflow comes down to four connected steps:
- Standardize mobile forms so field data is clean from the start
- Capture complete photo evidence before leaving the site
- Route tickets automatically to the right team
- Close work digitally with signatures and test results attached
When every step runs inside one system, nothing slips between the field and the office. One connected workflow – from capture to closeout – keeps field records complete, searchable, and ready for review.
FAQs
How do mobile forms reduce repeat truck rolls?
Mobile forms help cut repeat truck rolls because technicians can show up ready and leave with complete, accurate site data already recorded.
Role-specific digital checklists make that a lot easier. They can require safety sign-offs, measurements, and before-during-after photos, which helps reduce missing details. Real-time inventory tracking and barcode scanning also help techs confirm the right parts are on the truck while cutting manual entry mistakes.
What should happen if a technician is offline on site?
If a technician loses signal on-site, work doesn’t have to stop. With a mobile app that works offline, they can still complete tasks, record data, take photos, and collect digital signatures without an internet connection.
The app saves everything on the device first. Then, once the device reconnects, it automatically syncs those updates with the central ERP. That means less risk of lost work and more accurate records for the back office.
Which ticket metrics matter most for solar teams?
Solar teams should focus on metrics that cut waste, speed up field work, and keep assets producing as expected.
Some of the main ones are first-time fix rate, data completeness, MTTR, MTTA, and technician utilization. These numbers show how well crews handle issues on the first visit, how complete field data is, how long repairs take, how fast teams respond, and how well technician time is being used.
It also helps to track energy yield, system availability, and O&M cost per kW. Together, these metrics give teams a clearer view of project profitability and asset health, while helping reduce rework, labor hours, and fuel costs.
