
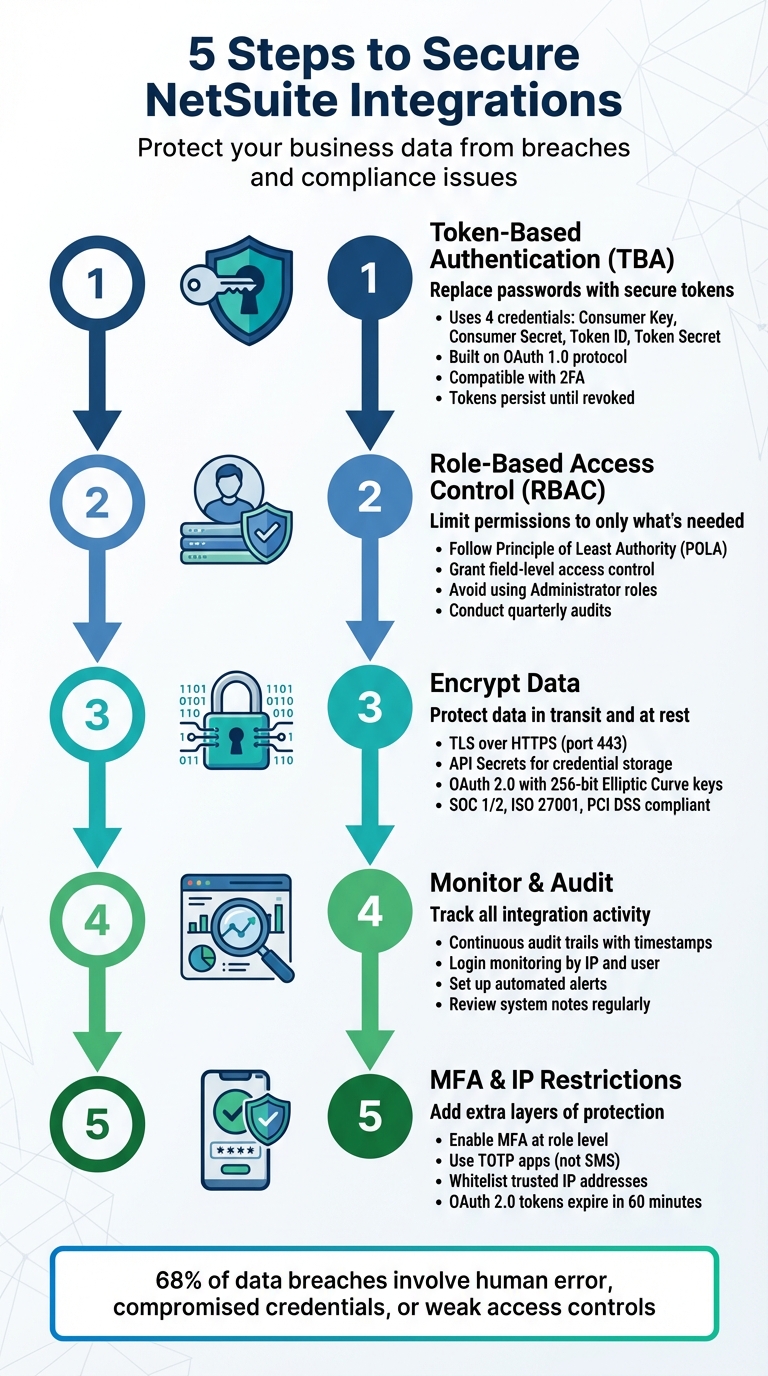
When you connect third-party apps to NetSuite, you’re exposing critical business data to potential risks. Without proper security measures, these integrations can become weak points in your system, leading to data breaches, compliance issues, financial losses, and reputational harm. Here’s how you can protect your NetSuite environment and ensure safe integrations:
- Use Token-Based Authentication (TBA): Replace passwords with secure tokens to reduce the risk of credential exposure.
- Implement Role-Based Access Control (RBAC): Limit app permissions to only the data they need, minimizing potential damage.
- Encrypt Data: Protect information during transmission and storage using TLS and secure credential storage.
- Monitor and Audit Activity: Regularly review system logs and set up alerts to detect unusual behavior.
- Enable Multi-Factor Authentication (MFA) and IP Restrictions: Add extra layers of security to protect user identities and restrict access to trusted networks.
These steps not only safeguard your data but also help maintain compliance with regulations like GDPR, HIPAA, and PCI DSS. By prioritizing integration security, you can protect your business and support growth without compromising sensitive information.
5-Step Process to Secure NetSuite Third-Party Integrations
Step 1: Set Up Token-Based Authentication
Token-Based Authentication (TBA) is a secure way to manage NetSuite integrations by using unique tokens instead of traditional usernames and passwords. This method ensures that sensitive login credentials aren’t stored in third-party applications, reducing the risk of exposure. Built on the OAuth 1.0 protocol, TBA is robust enough to support both SuiteTalk (web services) and RESTlets in NetSuite.
How Token-Based Authentication Works
TBA replaces password-based authentication with four key credentials: Consumer Key, Consumer Secret, Token ID, and Token Secret. These credentials work together to establish a secure connection between NetSuite and your third-party application. Each token is tied to a specific company, user, and role, ensuring a high level of security.
One major benefit of TBA is that integrations remain unaffected when a user’s password is updated in NetSuite. This eliminates the need to reconfigure credentials in connected applications. Additionally, TBA is compatible with Two-Factor Authentication (2FA), which has been mandatory for Administrator roles since version 2018.2. As ennVee explains:
"Using an Administrator role with a TBA token ensures your integrations will continue to work after the upgrade to 2018.2 [when 2FA was enforced]." – ennVee
Now, let’s walk through the steps to enable TBA in your NetSuite environment.
How to Enable TBA in NetSuite
Follow these five steps to set up TBA:
- Enable the Feature:
Go to Setup > Company > Enable Features. Under the SuiteCloud section, enable Token-Based Authentication. If you’re using RESTlets, also enable Client SuiteScript and Server SuiteScript. - Create an Integration Record:
Navigate to Setup > Integration > Manage Integrations > New. Assign a name to your integration, such as "Salesforce Sync" or "Shopify Connector." Set the status to "Enabled" and check the Token-Based Authentication box. For most standard integrations, leave "TBA: Authorization Flow" and "Authorization Code Grant" unchecked. Once saved, you’ll receive your Consumer Key and Consumer Secret. - Configure an Integration Role:
Go to Setup > Users/Roles > Manage Roles > New and create a new role. Choose a "Non-SAML" or "Accounting Center" type. Under Permissions > Setup, add "User Access Tokens", "Web Services" (or SOAP Web Services), and "Log in using Access Tokens" with Full access. - Assign the Role:
Edit the relevant employee record (Lists > Employees > Employees). Under the Access tab, assign the newly created integration role to the user. - Generate the Access Token:
Navigate to Setup > Users/Roles > Access Tokens > New. Select the Integration Record, User, and Role you just created. Save to generate the Token ID and Token Secret.
Important: Be sure to copy your Consumer Key, Consumer Secret, Token ID, and Token Secret immediately after they’re generated, as they will only be displayed once.
When setting up your third-party application, include these four credentials along with your NetSuite Account ID. The Account ID can be found under Setup > Company > Company Information. If you’re working in a Sandbox environment, remember that the Account ID will include a suffix like _SB1, and tokens will need to be regenerated whenever the Sandbox is refreshed. Finally, clear any username and password fields in the third-party app to avoid fallback to less secure authentication methods.
Once TBA is active, the next step is to configure role-based access control to fine-tune permissions.
Step 2: Set Up Role-Based Access Control (RBAC)
Once you’ve implemented token-based authentication, the next step is to tighten security further with Role-Based Access Control (RBAC). This approach ensures that access is restricted based on clearly defined roles, limiting what third-party apps can do within your NetSuite environment. NetSuite adheres to the Principle of Least Authority (POLA), a security best practice that grants users and integrations only the privileges they need to perform their tasks. As Oracle NetSuite explains:
"Oracle NetSuite follows the Principle of Least Authority (POLA) – employees are given only those privileges necessary to do their jobs." – Oracle NetSuite
RBAC allows for precise control, even down to specific fields, ensuring that third-party apps only access the data they genuinely need. For example, an inventory management app might only require view-only access to Items and Purchase Orders, leaving sensitive employee or financial data completely off-limits. By narrowing access in this way, you significantly reduce the potential damage if a third-party app is ever compromised.
How to Configure Roles and Permissions in NetSuite
To create a custom integration role, start by ensuring REST Web Services or SOAP Web Services are enabled. You can do this by navigating to Setup > Company > Enable Features under the SuiteCloud subtab. Once enabled, create a new custom role under Setup > Users/Roles > Manage Roles > New.
When creating a role, give it a clear and descriptive name, such as "Shopify Integration Role" or "Warehouse App Access." Under the Permissions tab, add only the specific permissions the app needs. For instance:
- If the app needs to view customer data, add "Lists > Customers" with the Level set to "View."
- If it needs to create sales orders, add "Transactions > Sales Orders" with Full access.
Certain permissions are mandatory for integrations to work effectively, including REST Web Services (Full), Log in using Access Tokens (Full), and SuiteAnalytics Workbook (Edit). Without these, the integration may fail to function as intended.
It’s crucial to avoid using Administrator or Full Access roles for web services integrations. Oracle NetSuite strongly advises against this:
"Using the administrator role for building web services integrations or accessing REST web services isn’t recommended for security reasons." – Oracle NetSuite
Instead, assign each integration its own dedicated user account. This not only enhances security but also makes it easier to track and audit the actions of individual third-party apps.
Best Practices for Managing User Roles
Configuring roles is just the beginning – keeping them secure over time is equally important. Conduct regular audits of your custom roles, ideally every quarter, to ensure permissions haven’t unintentionally expanded. As businesses evolve, it’s common for access controls to drift, creating potential security gaps.
When creating custom roles, use NetSuite’s standard roles as starting points. This approach saves time and helps ensure you don’t accidentally leave out critical permissions. Additionally, implement IP restrictions to limit the role’s access to specific, authorized server addresses.
Finally, take advantage of NetSuite’s audit trail features. These tools allow you to monitor transactions by user login and timestamp, providing a clear record of every action taken by the third-party app. This level of visibility is invaluable for maintaining security and accountability within your system.
Step 3: Encrypt Data in Transit and at Rest
To ensure secure communication between NetSuite and third-party applications, encryption is essential. Encryption makes intercepted data unreadable, reinforcing the security measures like RBAC and TBA discussed earlier.
Encryption Standards and Protocols
NetSuite uses encryption by default for all data exchanges and user credentials, adhering to recognized protocols. Connections rely on TLS over HTTPS (port 443) to safeguard REST and SOAP web services. This prevents threats like man-in-the-middle attacks and data interception during transmission.
For data at rest, NetSuite offers API Secrets, a secure repository for storing sensitive authentication credentials such as passwords, hashes, and keys. Instead of hardcoding these credentials into scripts, they are stored in an encrypted format, ensuring access is limited to authorized users and scripts. These practices align with compliance standards, including SOC 1 Type 2, SOC 2 Type 2, ISO 27001, and PCI DSS.
| Encryption Type | Method | Risk Mitigated |
|---|---|---|
| Data in Transit | TLS over HTTPS on port 443 | Protects against man-in-the-middle attacks |
| Data at Rest | API Secrets for secure credential storage | Prevents exposure of plaintext credentials |
| Authentication | OAuth 2.0 with 256-bit Elliptic Curve keys | Blocks credential theft and unauthorized access |
How to Enable Encryption for NetSuite Integrations
To implement encryption for your NetSuite integrations, follow these steps:
- Enable Necessary Features
Navigate to Setup > Company > Enable Features and open the SuiteCloud subtab. Check both "REST Web Services" and "OAuth 2.0" to activate encrypted communication channels for your integrations. - Set Up API Secrets
Protect integration credentials by creating API Secrets. Go to Setup > Company > Preferences > API Secrets and click "Create New". Assign a descriptive name (e.g., "Warehouse SFTP Password") and a unique script ID prefixed withcustsecret. Enter or upload the secret, adhering to NetSuite’s character limits. Use the Restrictions tab to enhance security. Specify allowed domains in the "Restrict To Domains" field – for example,sftp.shippingprovider.comfor a shipping integration. This ensures credentials cannot be redirected to unauthorized servers. Additionally, restrict access to specific employees or scripts as needed. - Generate OAuth 2.0 Certificates
For machine-to-machine integrations requiring OAuth 2.0, create a certificate using OpenSSL with theprime256v1elliptic curve. NetSuite mandates 256-bit Elliptic Curve keys for OAuth 2.0 credentials. Upload the public certificate in Setup > Integration > OAuth 2.0 Client Credentials (M2M) Setup. Note that certificates cannot exceed a two-year validity period, as NetSuite will automatically shorten longer expiration durations. - Update Secrets Thoughtfully
When updating SFTP credentials, keep the old ones active for at least an hour. This precaution ensures there’s enough time for the new credentials to propagate across the system, which can take up to 60 minutes.
Step 4: Monitor and Audit Third-Party Access
Keeping a close eye on third-party integrations is essential for maintaining security. NetSuite offers a continuous, detailed audit trail that logs every transaction, complete with user login details, integration tokens, and timestamps for every change. This level of visibility helps identify unauthorized access attempts or unusual behavior before they develop into bigger security problems.
Leveraging NetSuite’s Audit Trail Features
NetSuite tracks changes to configurations, customizations, administrative settings, and master data. Every action – whether it’s creating, modifying, or deleting – is logged in system notes, which detail the user, role, date, time, and the specific account affected. The Context field in system notes is especially helpful for monitoring integration activity.
"Robust, always-on audit trails for configuration, customization, administrative and master data changes allow finance leaders and auditors to quickly and easily investigate activity with the potential to impact security, controls or financial statements." – Oracle NetSuite
To simplify the auditing process, enable Internal IDs by navigating to Home > Set Preferences. This feature makes it easier to locate specific records and fields when reviewing logs or troubleshooting issues. For more advanced tracking of customer record activity, the NetSuite Compliance 360 SuiteApp enhances the system by capturing details like whether a record was viewed, changed, or deleted.
Regularly check the Login Audit Trail to monitor when and where integration accounts are accessing the system. NetSuite’s security features automatically block and log any unauthorized access attempts, providing a clear record of potential threats. For large-scale monitoring, consider integrating with a Security Information and Event Management (SIEM) system. This allows you to centralize alerts and logs, enabling near-real-time threat detection and response.
These audit tools naturally pave the way for setting up alerts to flag unusual activities.
Setting Up Alerts for Suspicious Activities
Proactive alerts are a key defense against security threats. Use saved searches to monitor critical financial controls and configure email alerts for any unusual or potentially fraudulent activities. Since the "Enable Features" page doesn’t include a built-in System Notes tab, you’ll need to create a custom saved search for system notes on this page and schedule it to run regularly. This helps identify unauthorized changes to key settings.
When managing API secrets under Setup > Company > Preferences > API Secrets, make sure to check the Expiration Warning box. This setting sends notifications before credentials expire, preventing unexpected downtime and avoiding last-minute credential replacements. Additionally, use the "Deleted Record" search type to track deleted transactions, which could signal data exfiltration or unauthorized actions by third-party apps.
NetSuite’s SOAP API may generate an "Invalid login attempt" error when rate limits are exceeded, instead of the standard 429 error. Monitor API usage closely and set up custom alerts for approaching rate limits. NetSuite’s 24/7 incident response and intrusion detection systems (IDS) also work to identify and block malicious traffic in real time.
| Audit Tool | Primary Purpose | Key Data Captured |
|---|---|---|
| Transaction Audit Trail | Tracking changes to financial records | User, action (create/change/delete), date, and amount |
| Login Audit Trail | Monitoring account access | User, time, IP address |
| System Notes | Detailed record-level history | Old vs. new values, context (UI vs. Script), and timestamp |
| API Secrets | Secure credential storage | Hashes, keys, and passwords for third-party integrations |
sbb-itb-2560759
Step 5: Enable Multi-Factor Authentication (MFA) and IP Restrictions
To wrap up your NetSuite integration security measures, adding Multi-Factor Authentication (MFA) and IP restrictions strengthens your defense. These two features work together to protect both user identities and connection points – even in cases where passwords or tokens might be compromised.
How to Configure MFA for Third-Party Integrations
MFA is applied at the role level in NetSuite. When you configure a role to require MFA, any user or integration associated with that role must complete an additional verification step.
"Multi-factor authentication (MFA) is another layer of securing user access to your NetSuite account. In addition to a username and password, a role can be configured with an additional layer of protection where users provide a verification code." – NetSuite
For integrations that can’t handle interactive MFA challenges, use Token-Based Authentication (TBA) or OAuth 2.0 instead of traditional password-based methods. These approaches ensure security while avoiding the need for manual MFA input. With OAuth 2.0, for instance, access tokens are valid for 60 minutes by default, so you’ll need to implement refresh token rotation to maintain uninterrupted access.
It’s also best to use TOTP-compliant apps like Google Authenticator rather than SMS-based codes. Oracle has discontinued SMS and voice-based two-factor authentication as of early 2024, transitioning entirely to more secure authenticator apps. Additionally, for integrations that don’t require user interface access, assign them to roles designated as "Web Services Only". This prevents those credentials from being used to log into the NetSuite interface.
While MFA secures user identities, IP restrictions add another layer of protection by limiting access to trusted networks.
How to Implement IP Whitelisting
IP restrictions enhance security by tying access to specific, trusted locations. To enable this, navigate to Setup > Company > Preferences > API Secrets. Uncheck the "Allow For All Domains" option and specify your trusted domains in the "Restrict To Domains" field.
"In the Restrict To Domains field, enter the domains where decrypted passwords can be sent (applicable to SFTP and HTTPS only). Separate multiple domains with a comma." – Oracle NetSuite Help
If a secret isn’t intended for use with SFTP or HTTPS, you can block it entirely by entering an invalid domain in the restriction settings. NetSuite’s API Secrets feature also supports credentials up to 1,000,000 characters in length. This allows you to reference credentials by script ID instead of embedding plaintext credentials directly into scripts.
| Feature | UI Login (MFA/2FA) | Integration (TBA/OAuth) |
|---|---|---|
| Primary Use | Human users accessing the browser interface | Third-party apps and automated scripts |
| Authentication | Email, password, and 6-digit TOTP code | Consumer Key/Secret and Token ID/Secret |
| 2FA Impact | Required for high-privilege roles | Bypasses UI 2FA for background processing |
| Persistence | Session-based; re-entry needed depending on trusted device settings | Persistent until revoked; not tied to password rotation |
Comparison of Authentication Methods for NetSuite Integrations
Authentication Methods Comparison Table
When working with NetSuite integrations, choosing the right authentication method is crucial to ensure a balance between usability and security. NetSuite provides three main options: Token-Based Authentication (TBA), OAuth 2.0, and Three-Step Authorization (3SA). Each has its own strengths and limitations, which can influence how you implement and maintain your integration.
TBA, based on the OAuth 1.0 protocol, is the go-to choice for integrations that rely on legacy SOAP web services. This method requires manual configuration in the NetSuite dashboard, including creating an Integration Record, assigning a role with specific permissions, and generating access tokens. Once set up, these tokens remain valid indefinitely unless manually revoked, making TBA a reliable option for long-term, background integrations where stability is key.
OAuth 2.0, on the other hand, is the modern standard with a more streamlined user experience. It eliminates the need for manual token management by redirecting users to NetSuite for authorization. This method also improves security by using scoped permissions, which restrict access to specific services like RESTlets or Suite Analytics. However, OAuth 2.0 tokens expire every 60 minutes by default, requiring you to implement refresh token logic. As Saurabh Rai from Apideck aptly puts it:
"OAuth 2.0 tokens expire (default 60 minutes). Implement refresh token rotation, or you’ll be debugging at 2 AM".
Lastly, Three-Step Authorization (3SA) is an automated OAuth 1.0 flow that uses a browser-based redirect for user authorization. While it allows user-level authorization without directly sharing credentials, it involves a more complex workflow for users and has largely been replaced by TBA for server-to-server integrations.
Here’s a table comparing these methods:
| Method | Description | Security Advantages | Implementation Steps in NetSuite | Limitations |
|---|---|---|---|---|
| Token-Based Authentication (TBA) | Uses OAuth 1.0 with Consumer Key/Secret and Token ID/Secret. | No need to store user passwords; bypasses UI two-factor authentication; tokens persist until revoked. | Enable TBA → Create a role with "User Access Tokens" permission → Assign user → Create Integration Record → Generate Access Token. | Requires manual token setup; tokens must be recreated if lost; no automatic expiration. |
| OAuth 2.0 | Relies on Client ID/Secret, Authorization Codes, and Refresh Tokens. | Scoped permissions limit access; short-lived tokens reduce exposure risk. | Enable OAuth 2.0 → Create an OAuth 2.0 client → User authorizes via redirect → Exchange authorization code for tokens. | Incompatible with SOAP web services; requires refresh token logic; tokens expire frequently. |
| Three-Step Authorization (3SA) | An OAuth 1.0 flow with browser-based user authorization. | Enables user-level authorization without sharing credentials. | Set up a callback URL → Implement redirect flow → Handle authorization response. | Complex for users; mostly replaced by TBA for server-to-server integrations. |
The choice often hinges on whether SOAP support is required. If your integration relies on SOAP web services, TBA is the only option. For newer REST-based integrations, OAuth 2.0 is typically preferred due to its alignment with modern security practices and ease of management for larger-scale applications.
Maintaining Security and How Blu Banyan Can Help

Blu Banyan’s NetSuite Security Expertise
Keeping NetSuite integrations secure is not a one-and-done task – it requires ongoing effort. This is where Blu Banyan steps in, offering secure and compliant NetSuite implementations that take full advantage of NetSuite’s built-in security features. Their specialized solutions, such as SolarSuccess ERP and SuiteApps like bluConnect, bluDocs, and bluChat, operate seamlessly within NetSuite’s native security framework.
What does this mean for you? By staying within NetSuite’s established security perimeter, which is regularly audited against global standards, Blu Banyan’s solutions simplify security management. For solar and construction companies that handle sensitive financial data and customer information, this approach eliminates the headache of managing separate security protocols for each integration.
Blu Banyan also sets up Role-Based Access Control (RBAC) to ensure that both employees and integrations have access only to what they need – nothing more. As Valence Security explains:
"NetSuite access control is the foundation of your ERP security posture".
By applying the Principle of Least Authority (POLA) down to the field level, Blu Banyan minimizes risks like unauthorized data changes or segregation of duties violations. This strong security foundation creates a proactive approach to long-term system maintenance.
Tips for Long-Term Security Maintenance
Once your NetSuite security setup is in place, keeping it secure requires consistent upkeep. Here are some practical steps for ongoing protection:
- Quarterly Reviews: Meet with your HR and Finance teams every quarter to disable orphan accounts and update user roles as needed.
- Monitor API Secrets: Use NetSuite’s API Secrets feature to track expiration dates and replace OAuth 2.0 certificates before they expire. If a certificate lapses, you’ll need to create a new mapping for the integration to work again.
- Audit Trails: Regularly review audit trails to track all transactions and changes.
- Custom Alerts: Configure alerts to monitor API rate limits across endpoints. Be aware that some NetSuite APIs return generic "Invalid Login Attempt" errors instead of specific "Too Many Requests" responses when limits are exceeded.
- Automate Identity Governance: Automate processes to immediately disable accounts and revoke roles when employees leave or change departments. This prevents orphan accounts from becoming security vulnerabilities.
Conclusion: Key Steps for Securing NetSuite Integrations
Securing NetSuite integrations is a must. With 68% of data breaches linked to human error, compromised credentials, or weak access controls, the risks of leaving your system exposed are too great to ignore. Luckily, you now have a clear path to safeguard your business. By implementing the strategies outlined earlier, you can fortify your NetSuite environment. Start by using Token-Based Authentication or OAuth 2.0, which eliminates the need to store passwords in third-party applications. Leverage Role-Based Access Control to ensure integrations only access the specific data they require – no more, no less. Encrypt your data in transit and at rest using trusted protocols, and activate Multi-Factor Authentication for all critical accounts, especially admin and finance users.
Security isn’t a one-time task – it’s an ongoing effort. Regularly manage your integration tokens following best practices, set up real-time alerts for critical security events, and conduct quarterly access audits to identify and remove inactive accounts or redundant roles. Together, these steps form a solid security framework for your NetSuite integrations. As NetSuite emphasizes:
"Security starts with strong encryption, role-based access controls, and robust password policies. NetSuite adds layers of additional protection, including multi-factor end-user authentication, and token-based application authentication".
FAQs
What makes Token-Based Authentication a secure option for NetSuite integrations?
Token-Based Authentication boosts the security of NetSuite integrations by replacing static usernames and passwords with cryptographically signed tokens. These tokens, made up of consumer key/secret and token ID/secret pairs, offer a safer alternative and avoid issues like password expiration.
This approach incorporates two-factor authentication, uses HMAC-SHA256 signing for added protection, and allows time-limited access without storing user credentials. By restricting access and leveraging strong encryption, Token-Based Authentication helps safeguard your NetSuite data from unauthorized access.
What are the advantages of using Role-Based Access Control (RBAC) in NetSuite?
Role-Based Access Control (RBAC) is a system that ensures users only have access to the data and tools necessary for their specific job roles. This approach streamlines permission management, minimizes the chances of unauthorized access, and helps safeguard against data breaches. It also aligns with established security protocols.
By tying access strictly to job responsibilities, RBAC strengthens system security and keeps sensitive business information well-protected. For organizations using NetSuite, RBAC is a crucial feature for maintaining control and supporting smooth, efficient operations.
Why is encrypting data in transit and at rest critical for NetSuite integrations?
Protecting sensitive information requires encrypting data both in transit and at rest. This ensures that data stays secure while being transferred between systems and while stored, minimizing the risk of breaches and keeping information confidential.
Encryption also plays a key role in helping organizations meet strict security standards and regulatory requirements. This is particularly critical when connecting NetSuite with third-party applications, where data moves across multiple platforms, making robust encryption essential for safeguarding both business and customer information.
