If your asset data depends on people typing updates, your records will drift. I’d set up NetSuite so GPS devices, RFID/BLE tags, and sensor feeds update asset records automatically for location, usage, condition, and status.
Here’s the short version:
- I’d use NetSuite as the main record system for tools, vehicles, and jobsite equipment
- I’d send IoT data through a middleware layer before it reaches NetSuite
- I’d lock down asset IDs, status codes, and location names before any device goes live
- I’d store high-volume telemetry in custom records, not directly on core asset records
- I’d use event-based updates for alerts and scheduled syncs for cleanup and reconciliation
- I’d plan for dead zones, retries, duplicate reads, and API limits from day one
A few points stand out. Solar soft costs can reach 65% of total system cost, so better asset visibility can help cut wasted labor and delays. Custom NetSuite integrations can cost $15,000 to $100,000+, which is why the integration model matters early. And if timestamps, asset IDs, or location values are wrong, the whole setup becomes hard to trust.
In plain terms, this article shows how I’d plan the data flow, prep NetSuite records, connect devices, automate updates, and test the setup so asset tracking stays accurate after launch.
1. What IoT Integration with NetSuite Solves for Asset Tracking
IoT integration keeps NetSuite in sync with moving assets by updating records on its own as location, condition, and usage change. That kind of visibility shifts how teams maintain, deploy, and account for assets.
1.1 The Business Case for Real-Time Asset Visibility
Live asset data helps teams make better calls inside NetSuite. Maintenance teams can schedule service based on actual runtime instead of fixed calendar intervals. Project managers get tighter job costing because equipment hours and location data flow straight into NetSuite project records.
The dollar impact can be big in solar and construction. Soft costs – such as permitting, financing, and installation – can make up as much as 65% of the total cost of a new solar system [4]. Better visibility and workflow automation help cut that load. When an asset changes status, NetSuite can kick off billing, approval, or maintenance workflows without someone having to step in.
You see the value most clearly in a handful of common tracking situations.
1.2 Common IoT Asset-Tracking Use Cases in Solar and Construction
The use cases change by asset type and industry, but a few patterns show up again and again across solar and construction work.
| IoT Data Point | NetSuite Impact | Business Benefit |
|---|---|---|
| GPS location | Updates asset record location | Prevents theft; improves deployment |
| Runtime/usage | Triggers maintenance workflow | Cuts downtime; extends asset life |
| Temperature/shock | Logs quality/compliance data | Protects material integrity |
| Geofence breach | Fires alert/notification | Speeds recovery; flags misuse |
| BLE tag scan | Confirms tool check-in/check-out | Cuts loss; avoids replacement cost |
Construction teams are using Bluetooth Low Energy (BLE) tags from systems like Milwaukee One-Key and DeWalt Tool Connect to track smaller tools that don’t make sense to track with cellular devices. It’s a practical move: you still get visibility, without paying for hardware and connectivity that would be too much for lower-cost items.
On solar sites, sensors can monitor temperature-sensitive parts like inverters and panels, then log that condition data straight into NetSuite quality and compliance records. And for field assets that need to stay in circulation, IoT data gives NetSuite a way to track them as fixed assets across many locations.
From here, the next piece is the data flow and the integration model that makes all of this run.
2. Define the Asset-Tracking Architecture Before Connecting Devices
Before you connect even one sensor, map out how data will move from the physical asset into NetSuite. That upfront work helps you avoid messy NetSuite implementation problems later, when the system is live and people are relying on it.
2.1 Core Components and Data Flow
Once the use cases are set, the next step is the architecture that moves those signals into NetSuite.
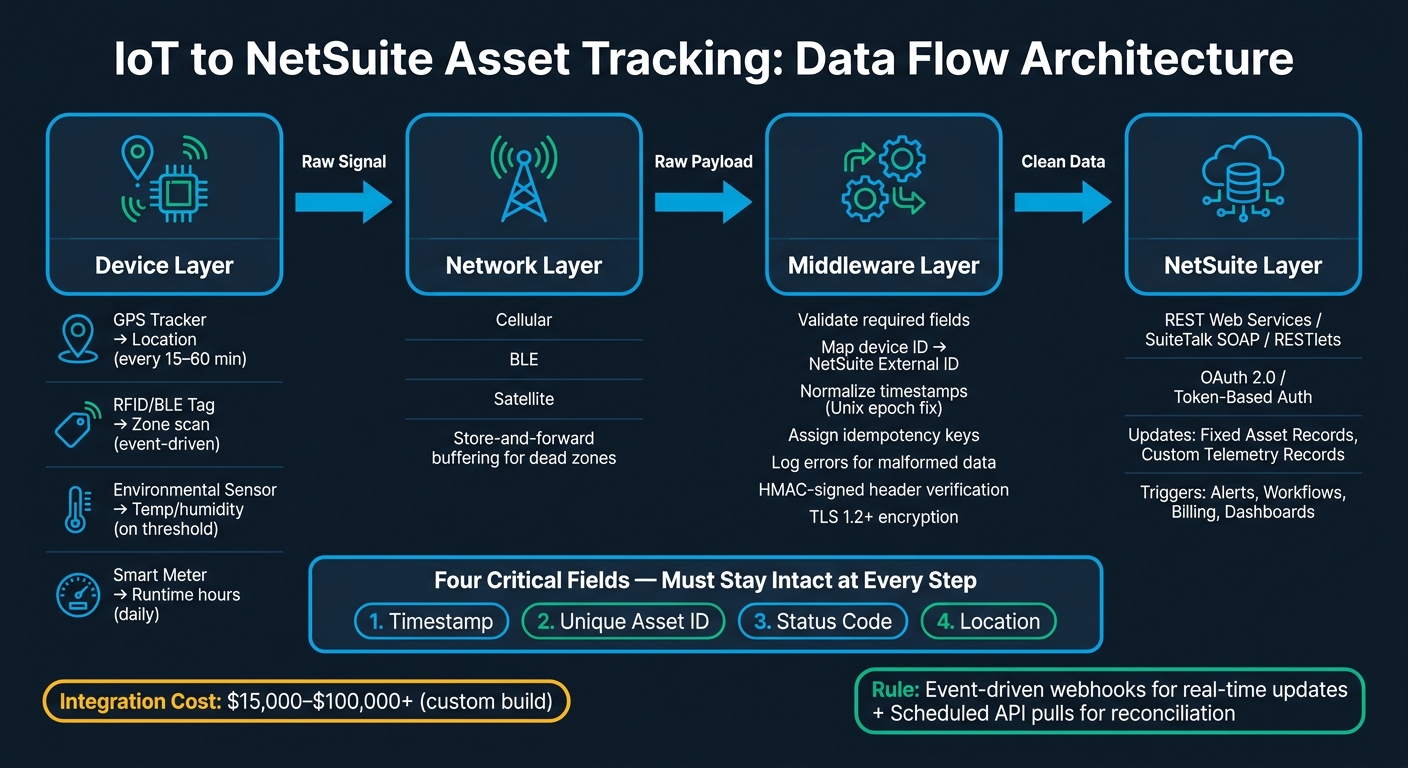
An IoT-to-NetSuite flow has four layers: device, network, middleware, and NetSuite. Each reading needs to keep the same core data from start to finish: timestamp, asset ID, status, and location.
Here’s how that flow works in practice. A sensor records an event, like movement or a status change. That signal then moves through a gateway or a direct network connection. Middleware takes the raw payload, checks it, and maps it into a format NetSuite can accept. From there, clean data moves into NetSuite through REST Web Services, SuiteTalk SOAP, or webhooks. Once the data is in place, NetSuite workflows can trigger alerts or update dashboards.
Those four fields – timestamp, unique asset ID, status code, and location – need to stay intact at every step. If one gets dropped, changed, or damaged during transformation, the NetSuite record stops being dependable.
2.2 Choose the Right Integration Model
The integration model shapes how fast location updates, status changes, and exception data reach NetSuite. The right choice depends on asset volume, latency needs, and how much complexity your NetSuite setup can handle.
Match the model to your asset count, response-time needs, and NetSuite professional services support capacity.
| Integration Model | Implementation Complexity | Maintenance Effort | Best-Fit Asset Environment |
|---|---|---|---|
| Native Connectors | Low | Low | Standard use cases with out-of-the-box data models |
| iPaaS (Middleware) | Medium | Medium | Mid-market teams running multiple integrations |
| Custom REST/SOAP | High | High | Unique data models, high-volume, or custom logic |
| Event-Based (Webhooks) | Medium | Medium | Real-time tracking where low latency is critical |
For many mid-market teams running more than one integration, an iPaaS platform often hits the sweet spot. You get reusable flows, built-in logging, and enough flexibility to deal with edge cases without building everything from zero. Custom REST integrations can be the better fit when the data model is unusual, but they cost more – usually $15,000 to $100,000+ as a one-time build, plus internal upkeep after launch.
A simple rule helps here: use event-driven webhooks for immediate updates, and use scheduled API pulls to reconcile the data later.
2.3 Security, Connectivity, and Exception Handling
Three failure points need attention early: security, connectivity gaps, and duplicate or missing data. If you handle these poorly, you can end up with false locations, duplicate scans, and alerts that never fire.
On the security side, use TLS 1.2 or higher for all data in transit. Inbound calls to your integration layer should be verified with HMAC-signed headers, so you can confirm the payload came from your IoT provider. NetSuite inbound REST Web Services use OAuth 2.0 or token-based authentication, so your middleware needs to support that before go-live.
Connectivity is a common issue on active job sites. Cellular dead zones are part of the deal, and a dropped connection should not mean lost data. That’s where store-and-forward buffering comes in. The device or gateway stores readings locally, then sends them once the connection comes back. One detail matters a lot here: the timestamp must reflect when the event happened, not when the upload finally went through.
For exception handling, assign idempotency keys to every IoT reading. That way, a network retry won’t create a duplicate record. It also helps to set alerts for field changes that break mappings. If a NetSuite admin adds or renames a custom field, your mapping can fail quietly unless you catch it.
Next, map each device field to the NetSuite records it will update.
3. Prepare NetSuite Records and IoT Data for Clean Tracking
Once your architecture is mapped and your security model is set, the next move is getting NetSuite ready to take in device data. If your master data is messy, device signals can land on the wrong asset fast.
3.1 Standardize Asset IDs, Statuses, and Locations
Every IoT payload needs a reliable anchor in NetSuite. That anchor is the asset ID.
Before any device goes live, set a strict naming convention for fixed equipment, serialized tools, fleet vehicles, and other field assets. Use a serial number or MAC address as the primary key. That gives each device payload a one-to-one match with a NetSuite record, with no gray area.
Location data needs the same kind of discipline. Use a clear hierarchy and keep it consistent: Warehouse → Service Yard → Vehicle → Job Site. Each level should map to a real NetSuite location record. Then, when a GPS tracker or RFID scan sends a position, the integration layer can route that reading to the right location record automatically.
Status codes should be locked down before go-live. Use the same values in NetSuite and in the IoT platform so both sides speak the same language.
Once IDs, locations, and statuses are standardized, you can define the NetSuite fields that each reading should update.
3.2 Create the NetSuite Fields and Records the Integration Will Update
Use standard NetSuite records for master asset data. For high-frequency telemetry, use custom records instead. If you store minute-by-minute GPS pings or temperature readings directly on a Fixed Asset record, reporting will slow down.
For the fields themselves, make the IoT integration the source of updates for every custom field it writes to. Set those fields to read-only so users can’t overwrite system-updated values by hand.
Common fields to create include:
- last known location
- battery level
- runtime hours
- current temperature
- current location and status
3.3 Map Device Data to NetSuite Fields
Each device type should map to a single NetSuite field and a set update cadence. That keeps the setup clean and cuts down on confusion later.
| Device Type | Data Captured | NetSuite Field Mapped | Update Frequency |
|---|---|---|---|
| GPS Tracker | Latitude/Longitude | custrecord_last_known_location | Every 15–60 minutes |
| Environmental Sensor | Temperature/Humidity | custrecord_current_temp (Custom Record) | On threshold breach |
| RFID Tag | Zone entry/exit scan | custrecord_current_location_id | Event-driven (on scan) |
| BLE Asset Tag | Battery level, proximity | custrecord_device_battery_pct | Daily or below 20% |
| Smart Meter | Runtime hours | custrecord_equipment_runtime | End of shift/Daily |
Normalize timestamps in the integration layer. Microcontrollers can misformat Unix epoch timestamps, so the transformation layer needs to fix that before the data reaches NetSuite. For offline devices, record the event time, not the upload time.
Once the mapping is in place, you’re ready to connect devices and automate NetSuite updates.
4. Connect IoT Devices to NetSuite and Automate Updates
With asset records set up and field mappings in place, the next step is simple in theory and tricky in practice: get data into NetSuite on a steady basis. This is the point where your planned architecture turns into a working system.
4.1 Configure Device Connectivity and the Integration Layer
Each device should be registered in both the IoT platform and the integration middleware before it sends data to NetSuite. Map every device ID to the NetSuite External ID, then set the right network protocol – cellular, BLE, or satellite – based on where the asset is used, and route data to the correct middleware endpoint.
Sync timing should match business needs, not just default settings. A high-value asset on a remote job site may need updates more often than a stationary piece of warehouse equipment. At the same time, the integration needs to stay within NetSuite concurrency limits.
The middleware layer handles validation, mapping, and logging for incoming payloads. In most cases, devices send JSON payloads, so the transformation layer should check required fields and log errors when something is missing or malformed.
For the NetSuite connection, RESTlets (SuiteScript 2.x) are a solid choice for JSON-based server-to-server updates. They support custom server-side logic and can process multiple asset updates in one HTTP call. Use Token-Based Authentication (TBA) for RESTlet access.
With the device-to-record link in place, the next job is deciding what each event should do inside NetSuite.
4.2 Build Record Updates, Workflows, and Alerts in NetSuite
Once data reaches NetSuite, each event should trigger one action: an update, an alert, or a workflow.
| IoT Event | NetSuite Action |
|---|---|
| GPS data shows an asset outside a geofenced zone | Update the location field or flag an out-of-bounds status |
| Temperature or vibration crosses a threshold | Trigger an alert or workflow notification |
| Asset deployment is verified | Update fixed asset status and trigger billing schedules |
| Periodic heartbeat or telemetry arrives | Store raw sensor data in a custom record for reporting and alerts |
For rented or mobile equipment, custom scripts often do more work than standard workflows. IoT events can connect to billing schedules and invoice approval workflows, which cuts admin work and keeps financial records tied to physical asset status. That means physical status, billing, and approvals stay aligned in one system.
As volume grows, use Work Orders and Assemblies to keep inventory and fixed assets aligned.
When the integration calls for custom scripts or more involved record logic, outside implementation help can save a lot of time.
4.3 When to Use Blu Banyan for NetSuite Integration Work

Blu Banyan can help design the NetSuite record model, middleware, and RESTlet logic for solar and construction asset tracking.
5. Test, Monitor, and Scale the Asset-Tracking Solution
5.1 Validate Data Accuracy, Alerts, and Dashboards
Once devices are mapped to NetSuite fields, test every path before go-live. Simulate device events and make sure each one updates the right asset field. Don’t just assume the mapping works. Check it record by record.
Confirm device time sync before production. Then verify that test payloads land in the right NetSuite fields.
You should also test failure states on purpose. Move a device out of range or simulate a dead battery, then check that NetSuite marks the asset as Disconnected or Offline instead of showing old data as if it were current.
Those failure tests also help you set alert ownership and escalation rules.
5.2 Set Maintenance and Governance Rules
After launch, watch failed syncs right away. Silent drift is the biggest day-to-day risk.
Use audit logs to confirm IoT owns telemetry fields and finance owns valuation fields. That shows the integration, not a manual change, is driving asset status. It also helps protect finance-owned fields from accidental overwrites.
As device count grows, keep an eye on SuiteTalk concurrency and rate limits. High-volume IoT data flows can hit those limits and lead to dropped transactions, so use an integration pattern that buffers or aggregates data when needed. Run the integration in a sandbox with lifelike volumes before production, and test again after each NetSuite upgrade. Scripts that depend on internal IDs can break after upgrades.
The checklist below covers the failure points teams run into most often after launch:
| Checklist Category | Monitoring Task | Success Metric |
|---|---|---|
| Sync Reliability | Monitor SuiteTalk concurrency and rate limits | No dropped transactions due to throttling or concurrency limits |
| Data Accuracy | Compare device timestamps vs. NetSuite record updates | Device timestamps and ERP updates stay aligned |
| Alert Integrity | Review temperature or boundary alerts for false positives | Alerts reliably reflect real device conditions |
| System Health | Check sensor battery levels and gateway connectivity | Active devices continue reporting within the expected heartbeat interval |
| Governance | Review audit logs for unauthorized manual field changes | No unauthorized manual overrides on automated asset status fields |
5.3 Key Takeaways for a Successful Rollout
A good rollout has less to do with how many devices you deploy and more to do with clean data, close monitoring, and clear ownership.
What tends to separate smooth rollouts from messy ones? A clean asset data set, the right integration model, and active monitoring. Pick an integration model that matches your data volume, and plan for a middleware buffer so NetSuite’s finance and inventory operations don’t get hit by traffic spikes. Validate alerts and dashboards before go-live, not after. Give one internal owner the job of monitoring flows, handling governance, and running pre-release tests.
Real-time visibility only works when the data model, alerts, and governance stay disciplined after go-live.
FAQs
What IoT devices work best with NetSuite asset tracking?
The best fit is usually IoT sensors and tracking devices that send live data on an asset’s status, location, or condition. Common examples include equipment health sensors, GPS trackers, and RFID tags.
These devices tend to work best when they support standard protocols like MQTT, HTTP, or REST. That makes it much easier to pass data into NetSuite through APIs, custom scripts, or middleware for steady, reliable asset tracking.
How do you prevent duplicate or missing asset updates?
Use idempotency keys, add a unique identifier to every data payload, and build the system to handle retries with exponential backoff.
That setup does two jobs at once. It helps the system spot and ignore duplicate events, and it lets you retry failed updates without creating duplicate records or repeat actions.
Should telemetry data live in NetSuite or middleware?
Usually, telemetry data belongs in middleware, not inside NetSuite itself. Raw IoT streams can put too much pressure on NetSuite due to API concurrency limits and data governance concerns.
A common setup is to use middleware as the buffer between devices and NetSuite. It handles routing, retries, and data transformation, then passes along only the processed data that matters. That keeps NetSuite more stable while still giving teams the asset tracking and operational visibility they need.
